
How to Disable / Enable Auto Defragmentation at Start up & Boot time
 |
Well, I will teach you how to enable / disable automatic hard drive defragmentation in window vista and window 7. To disable it just follow these steps.
First click "Start" orb then type in "regedit" and press on it.
The Registry Editor opens in a new Window. Click the "HKEY_LOCAL_MACHINE" then "SOFTWARE" then "Microsoft" then "Dfrg" and click the "BootOptimizeFunction" folder.
Now look at the right side of your registry editor. In here the tutorial will be divided into two. The first one is how to disable automatic defragmentation and the second is how to enable automatic defragmentation.
How to Disable Automatic Defragmentation at start up and boot time
Right-click on the "Enable" and click edit. In the Value data box type, "N" then click OK.
Then Right-click on the keyword "Optimizecomplete" and click edit.
In the Value Data box, change "Yes" to "No". Confirm by clicking OK. So the automatic hard disk defragmentation will be disable.
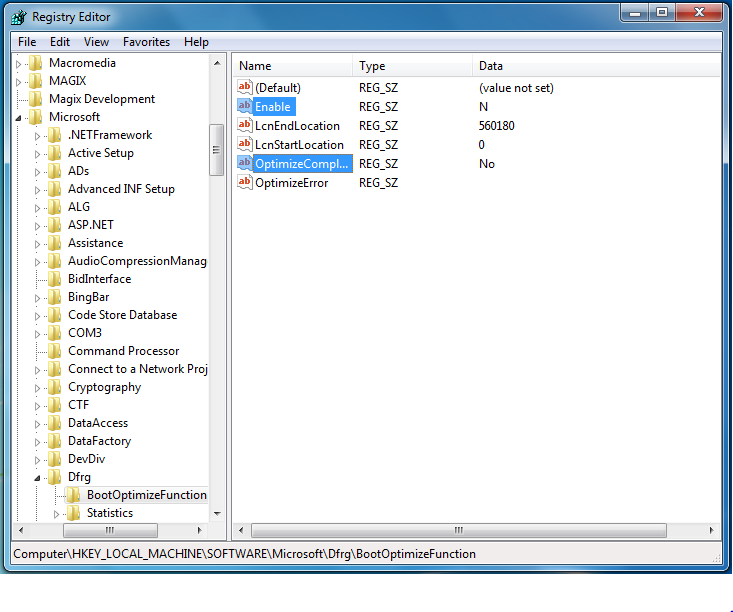 |
| How to Disable Automatic Defragmentation at start up and boot time |
How to Enable Automatic Defragmentation at start up and boot time
Check and see if "Enable" is already there, right click on it then click "modify" Double click on Enable. This will bring up Value Data box. Put in "Y" to enable automatic disk defragmentation.
 |
| How to Enable Automatic Defragmentation at start up and boot time |
If "Enable" is not there, follow the steps to create "Enable". Right click on the right hand side of your registry editor. Select "New" and then select "String Value". Rename the new String Value "Enable". Then double click on it and the value data box put in "Y" to enable automatic hard disk defragmentation.
Then Right-click on the keyword "Optimizecomplete" and click edit.
In the Value Data box, change "No" to "Yes". Confirm by clicking OK. So the automatic hard disk defragmentation will be enable.
Close the Registry Editor. Changes will be effective upon restarting Windows.
 |
Have you enjoy? Please help us improve this article, We encourage you to kindly please post a comment below for your reaction, correction, question and suggestion. Thanks
 Read More
Add your Comment
Read More
Add your Comment
How to Disable / Block USB Flash Drive's Autorun
 |
Well there are many ways to prevent that like having a latest antivirus program or having a security program for USB. But the most effective why to prevent transferable virus, malware, spyware, rootkits and identity theft is to disable USB flash drive's autorun.
Well, I will teach you how to ensure your computer safety from transferable malicious programs. I will teach you how to disable autorun by default under window to prevent computer infections through USB flash drive. I see a lots of internet cafe doing this. Ok lets start follow these steps.
First, Click "Start" and open "Notepad". Then we will create a .reg file, In the opened Notepad copy paste the code below and name it as "autorun_disable.reg"
Code:
[HKEY_LOCAL_MACHINE\SOFTWARE\Microsoft\Windows\CurrentVersion\policies\Explorer]

"NoDriveTypeAutoRun"=dword:000000ff


[HKEY_CURRENT_USER\Software\Microsoft\Windows\CurrentVersion\Policies\Explorer]
"NoDriveTypeAutoRun"=dword:000000ff |
| Paste the code in notepad and save it as autorun_disable to disable USB flash drive autorun |
After that Double-click the file to run. You will receive a message asking if you want to add data in the registry.
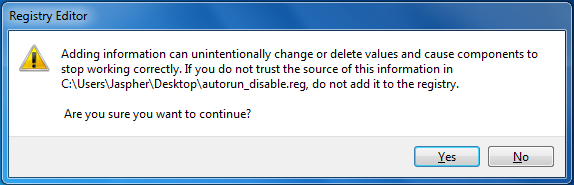 |
| Double click the create reg file and click yes to disable USB flash drive autorun |
Click Yes to allow the change. Then Restart the system for the changes to take effect.
|
Have you enjoy? Please help us improve this article, We encourage you to kindly please post a comment below for your reaction, correction, question and suggestion. Thanks
Read More
Add your Comment
Customize Window Default User Account Picture
 |
Well, I'm gonna teach you the simple way on how to change your window account's default image / picture.
For Windows XP/vista/seven
First, click "Start" orb and click Control Panel. Go to "User Accounts" then click on your account and select on "Change my Picture".
Choose the image you like from the above section, or browse your hard disk to make use of a custom picture.
 |
| Customize Default User Account Picture in Window XP |
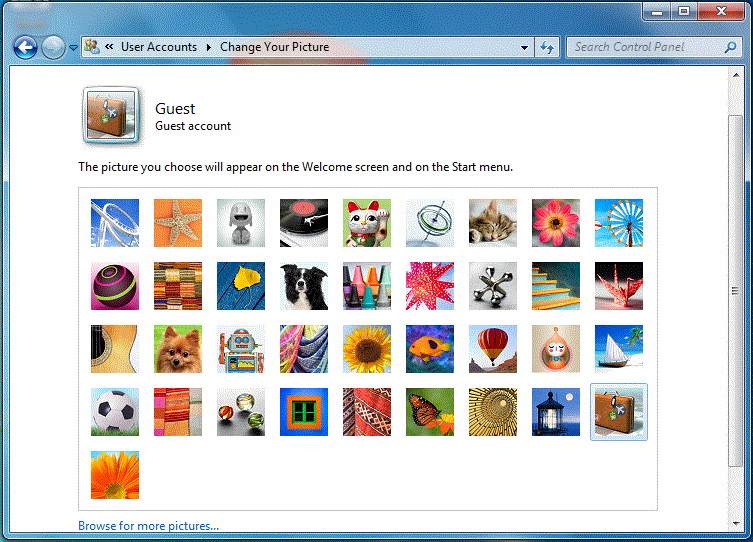 |
| Customize Default User Account Picture in Window Vista & 7 |
Quick Way on Windows Seven/Vista
Quick way to change window account's default image / picture.
First, click "Start" orb then click on the icon (on upper right) of your account. In my sample picture below is a briefcase.
 |
| Quick Way Customize Default User Account Picture in Window Vista & 7 |
Then select "change your image. Choose the image you want to save and click "edit".
There you go. Hope you like your new account's image / picture.
|
Have you enjoy? Please help us improve this article, We encourage you to kindly please post a comment below for your reaction, correction, question and suggestion. Thanks
Read More
Add your Comment
Complete List of Keyboard Shortcut Keys in Window XP
 |
What is Shortcut keys?
Shortcut keys are keyboard keys (or key combinations) which are configured to execute an often-used command or set of commands.
Windows XP Shortcuts:
ALT+- (ALT+hyphen) Displays the Multiple Document Interface (MDI) child window's System menu
ALT+ENTER View properties for the selected item
ALT+ESC Cycle through items in the order they were opened
ALT+F4 Close the active item, or quit the active program
ALT+SPACEBAR Display the System menu for the active window
ALT+TAB Switch between open items
ALT+Underlined letter Display the corresponding menu
BACKSPACE View the folder one level up in My Computer or Windows Explorer
CTRL+A Select all
CTRL+B Bold
CTRL+C Copy
CTRL+I Italics
CTRL+O Open an item
CTRL+U Underline
CTRL+V Paste
CTRL+X Cut
CTRL+Z Undo
CTRL+F4 Close the active document
CTRL while dragging Copy selected item
CTRL+SHIFT while dragging Create shortcut to selected iteM
CTRL+RIGHT ARROW Move the insertion point to the beginning of the next word
CTRL+LEFT ARROW Move the insertion point to the beginning of the previous word
CTRL+DOWN ARROW Move the insertion point to the beginning of the next paragraph
CTRL+UP ARROW Move the insertion point to the beginning of the previous paragraph
SHIFT+DELETE Delete selected item permanently without placing the item in the Recycle Bin
ESC Cancel the current task
F1 Displays Help
F2 Rename selected item
F3 Search for a file or folder
F4 Display the Address bar list in My Computer or Windows Explorer
F5 Refresh the active window
F6 Cycle through screen elements in a window or on the desktop
F10 Activate the menu bar in the active program
SHIFT+F10 Display the shortcut menu for the selected item
CTRL+ESC Display the Start menu
SHIFT+CTRL+ESC Launches Task Manager
SHIFT when you insert a CD Prevent the CD from automatically playing
WIN Display or hide the Start menu
WIN+BREAK Display the System Properties dialog box
WIN+D Minimizes all Windows and shows the Desktop
WIN+E Open Windows Explorer
WIN+F Search for a file or folder
WIN+F+CTRL Search for computers
WIN+L Locks the desktop
WIN+M Minimize or restore all windows
WIN+R Open the Run dialog box
WIN+TAB Switch between open items
There you go, try it out.
|
Have you enjoy? Please help us improve this article, We encourage you to kindly please post a comment below for your reaction, correction, question and suggestion. Thanks
Read More
Add your Comment
How To Create Password Protected Folder Without Using Software
 |
Well, I will teach you how to create a folder with a password so that only those user who knows the password can open it. Ok lets start, just follow these steps.
 |
| Create a New folder then make a new text file inside it |
First make a new folder ( name it as you like ) then inside this folder, right click then "new" and click "Text Document". Open the text file then copy the entire code below and paste it inside.
Code:
Quote:

Quote: cls

@ECHO OFF

title Folder Private

if EXIST "Control Panel.{21EC2020-3AEA-1069-A2DD-08002B30309D}" goto UNLOCK

if NOT EXIST Private goto MDLOCKER

:CONFIRM

echo Are you sure you want to lock the folder(Y/N)

set/p "cho=>"

if %cho%==Y goto LOCK

if %cho%==y goto LOCK

if %cho%==n goto END

if %cho%==N goto END

echo Invalid choice.

goto CONFIRM

:LOCK

ren Private "Control Panel.{21EC2020-3AEA-1069-A2DD-08002B30309D}"

attrib +h +s "Control Panel.{21EC2020-3AEA-1069-A2DD-08002B30309D}"

echo Folder locked

goto End

:UNLOCK

echo Enter password to unlock folder

set/p "pass=>"

if NOT %pass%== password here goto FAIL

attrib -h -s "Control Panel.{21EC2020-3AEA-1069-A2DD-08002B30309D}"

ren "Control Panel.{21EC2020-3AEA-1069-A2DD-08002B30309D}" Private

echo Folder Unlocked successfully

goto End

:FAIL

echo Invalid password

goto end

:MDLOCKER

md Private

echo Private created successfully

goto End
:EndAfter you've paste the code dont save it yet. Find this line : (if NOT %pass%== password here goto FAIL ) and change the word "password here" to the password you want.
 |
| Find password here then replace it with the desire password |
So your password here becomes "InTechTalk" make sure that you can remember it. After that go to 'save as' & name this file as "locker.bat ". Now back to the folder & you will find a "LOCKER command".
 |
| Locker command screenshot |
Double Click on it & you will find a new folder (Private ). Ok, now copy what you want in this "Private Folder" & after that come out of the folder.
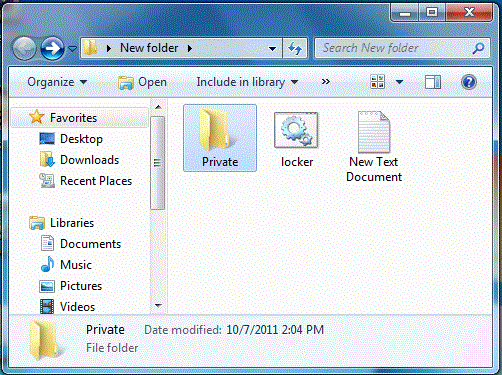 |
| New Private folder screenshot |
Double click on locker again. It will open and ask if you want to lock your folder? Y/N ?. Press "Y" and press enter, then your private folder will dissapear. If you want to UNLOCK your folder, go to "LOCKER command" & type your password and you will see your private folder.
It not only hides the folder, but in case, you unhide all files... and try opening it without entering password, it will take you to the control panel...
|
Have you enjoy? Please help us improve this article, We encourage you to kindly please post a comment below for your reaction, correction, question and suggestion. Thanks
Read More
Add your Comment
How To Fix Mozilla Firefox's Addons Compatibility Problem
 |
First open up mozilla firefox then type in "about:config" then enter. Click the "I'll be careful" button.
 |
| open up mozilla firefox then type in about:config then enter. Click the I'll be careful button |
Then here we will create a new boolean to make all addons compatible to your firefox. Right click onto it (anywhere) then click "new" and then click "boolean".
 |
| create a new boolean, Right click onto it then click new and then click boolean |
After that a new boolean value box will appear, copy one of the code below that correspond to your current mozilla firefox that you use or currently have (make sure not to copy the parenthesis and the word inside it) and paste it in the "enter the preference name" then click ok"
 |
| Copy then paste the code and paste it in the enter the preference name |
Codes:
extensions.checkCompatibility.4.0 (for Firefox 4.0)extensions.checkCompatibility.5.0 (for Firefox 5.0)extensions.checkCompatibility.6.0 (for Firefox 6.0)extensions.checkCompatibility.7.0 (for Firefox 7.0) |
| click false and then click ok |
Then click "false" and then click "ok". After that restart your mozilla firefox (not your computer). And when it open again, You may try now to install any addons you want to your mozilla firefox and see no problem while installing it.
|
Have you enjoy? Please help us improve this article, We encourage you to kindly please post a comment below for your reaction, correction, question and suggestion. Thanks
Read More
Add your Comment
How To Speed Up / Optimize Start Menu
 |
First click start orb then type in "regedit" without the quotaion at the search bar and press enter.
 |
| Click start then type in regedit |
Then when regedit appear,Navigate to HKEY_CURRENT_USER\Control Panel\Desktop
Select "MenuShowDelay" from the list on the right. Right on it and select "Modify".
 |
| Navigate to HKEY_CURRENT_USER\Control Panel\Desktop & Select MenuShowDelay |
Change the default value "400" to "0" then press ok.
 |
| Change the default value 400 to 0 then press ok |
That's it, Reboot your computer to see some changes.
|
Have you enjoy? Please help us improve this article, We encourage you to kindly please post a comment below for your reaction, correction, question and suggestion. Thanks
Read More
Add your Comment
How To Delete / Remove Undeletable Files
 |
Deleting Undeletable File Manually
Aere's a trick for removing undeletable file. As you can see in the picture below the "SoftwareU.." is my sample undeleted file. To remove / delete it just follow the steps. First open Notepad, then type anything on it and save as.
 |
| Step 1 for deleting undeletable file : Open notepad and save it |
After that locate the folder where the undeletable files are and change the "file type" to "All files" to make all files in the folder or container to be visible.
 |
| Step 2 for deleting undeletable file: Locate it and click All Files |
Then click the undeletable file once so its name will be copy in the "filename" box of the notepad and add " quotation mark at the start and end of the name.
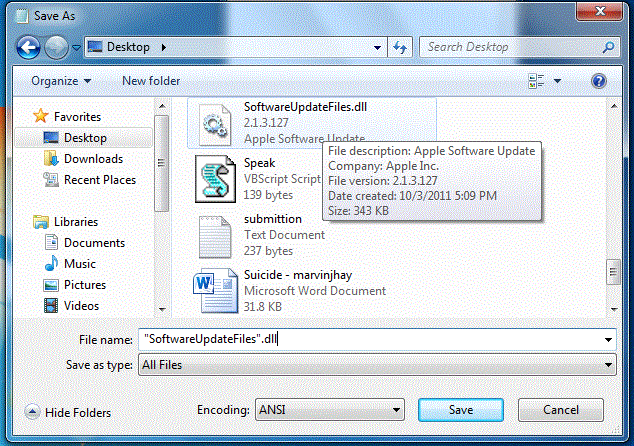 |
| Step 3 for deleting undeletable file: Click it once and add quotation mark |
The filename should have the extension of the undeletable file so that it will overwrite it. Then click save and it should ask you wether to overwrite it or not. ( if it ask you, that means your on the right track) Pick Yes.
Thats it, Now you should be able to remove the undeletable file just by deleting it normally.
How To Resolve Error Message Saying "Error Deleting File or Folder" & "File or Folder In Use"
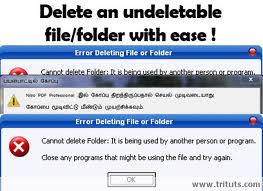
In some cases if you try to remove files and then receive a message just like the pictures below that means that the file is currently use by a running program. If you wish to delete / remove it, open "task manager" by pressing (cntrl + alt + delete) or right click on the taskbar then click "Start Task Manager" and click the "process" tab find the program and right click and choose "End Process". Make sure you know what program is using the file that you want to remove. After that you may now delete that folder or files.
 |
| Window Xp : Error Message Saying Error Deleting File or Folder |
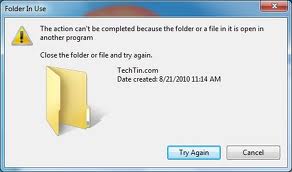 |
| Window Vista & 7 : Error Message Saying File / Folder In Use |
How to Resolve Message Saying "Folder Access Denied"
And if you see a message just like the picture below. That means that you dont have the rights to delete it, you need the Admin / Administrator's permission for you to be able to delete it. Log in the Administrator's Account and delete it.
 |
| Window XP : Error Message Saying You need permission to perform this action |
 |
| Window Vista & 7 : Error Message Saying You need permission to perform this action |
That's it, Hope your problem has been resolve.
|
Have you enjoy? Please help us improve this article, We encourage you to kindly please post a comment below for your reaction, correction, question and suggestion. Thanks
Read More
Add your Comment
Recover Deleted Files In A Free Way
 |
First is open recycle bin on the desktop then click or highlighten the deleted files then press the right click and choose "restore file" or just drag it out of the recycle bin and drop it to your desktop. That's it you now recovered your files.
 |
| Restore back files that has been deleted |
But in worse scenario, what if you deleted the file and you clean the recycle bin. Oh no, that would be a big problem for you. Well, I will tell you the fact that there's free software that can recover deleted files that have been deleted from recycle bin. The free software is called "Restoration".
What is Restoration
Restoration is an easy to use and straight forward tool to undelete files that were removed from the recycle bin or directly deleted from within Windows, and we were also able to recover photos from a Flash card that had been formatted. Upon start, you can scan for all files that may be recovered and also limit the results by entering a search term or extension. In addition, it also provides the option to wipe the found files beyond simple recovery. The program is small and standalone, it does not require installation and can also run from a Floppy disk. Restoration works with FAT and NTFS as well as digital cameras cards.
Download Restoration here
 |
| Restore back deleted files in Recycle bin that has been deleted |
After finish downloading, install it then go to C:Drive and open Restoration folder. Run Restoration program, click the "Search Deleted Files" button at the sidebar and wait until it finish searching for all deleted files. Then select the file that you want to restore back and click the "Restore by Copying" button.
That's it hope you like it.
|
Have you enjoy? Please help us improve this article, We encourage you to kindly please post a comment below for your reaction, correction, question and suggestion. Thanks
Read More
Add your Comment
Guide On How To Disable Automatic Reboot On System Failures
 |
Well, I will teach you how to disable the automatic rebooting of your computer. So when an error occured you will get the chance of knowing its cause. So lets disable the automatic restarting follow these steps.
 |
| Search sysdm.cpl using start menu search bar |
First click "start orb" then on search bar type in "sysdm.cpl" then click on it. Take note: In some cases in window 7 and vista you'll have to open it using right click then "run it as administrator".
After that, the System Properties box will appear. Click the "Advanced" tab then in Startup and Recovery click "Settings".
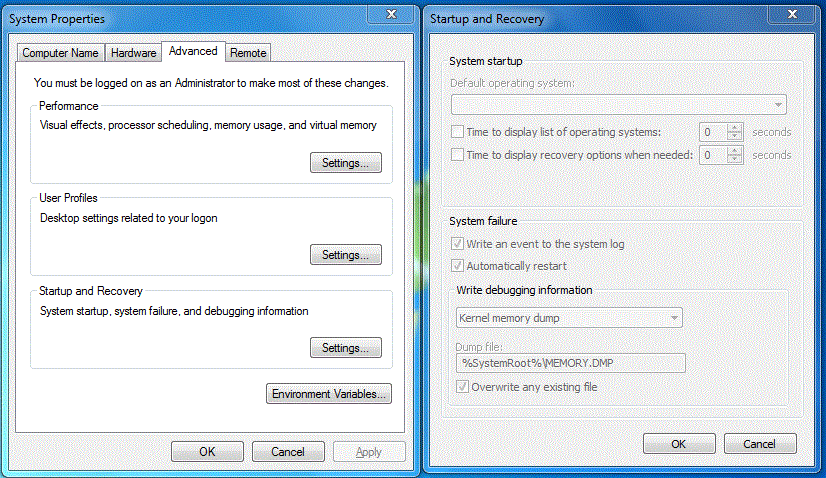 |
| System properties advance tab box and startup & recovery setting box |
Then Startup and Recovery box will appear. In the System Failure, uncheck the box for "Automatically Restart" and then click the OK button.
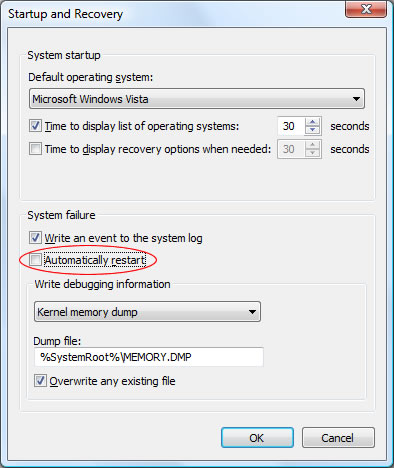 |
| Disabling / Turning off system automatic restart on system failures |
There you go, your computer now wont reboot if an error occured. You'll have the chance to fix it now.
|
Have you enjoy? Please help us improve this article, We encourage you to kindly please post a comment below for your reaction, correction, question and suggestion. Thanks
Read More
Add your Comment
 Previous Article


