How To Speed Up / Optimize Start Menu
 |
First click start orb then type in "regedit" without the quotaion at the search bar and press enter.
 |
| Click start then type in regedit |
Then when regedit appear,Navigate to HKEY_CURRENT_USER\Control Panel\Desktop
Select "MenuShowDelay" from the list on the right. Right on it and select "Modify".
 |
| Navigate to HKEY_CURRENT_USER\Control Panel\Desktop & Select MenuShowDelay |
Change the default value "400" to "0" then press ok.
 |
| Change the default value 400 to 0 then press ok |
That's it, Reboot your computer to see some changes.
 |
Have you enjoy? Please help us improve this article, We encourage you to kindly please post a comment below for your reaction, correction, question and suggestion. Thanks
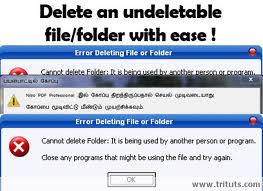
How To Delete / Remove Undeletable Files
 |
Deleting Undeletable File Manually
Aere's a trick for removing undeletable file. As you can see in the picture below the "SoftwareU.." is my sample undeleted file. To remove / delete it just follow the steps. First open Notepad, then type anything on it and save as.
 |
| Step 1 for deleting undeletable file : Open notepad and save it |
After that locate the folder where the undeletable files are and change the "file type" to "All files" to make all files in the folder or container to be visible.
 |
| Step 2 for deleting undeletable file: Locate it and click All Files |
Then click the undeletable file once so its name will be copy in the "filename" box of the notepad and add " quotation mark at the start and end of the name.
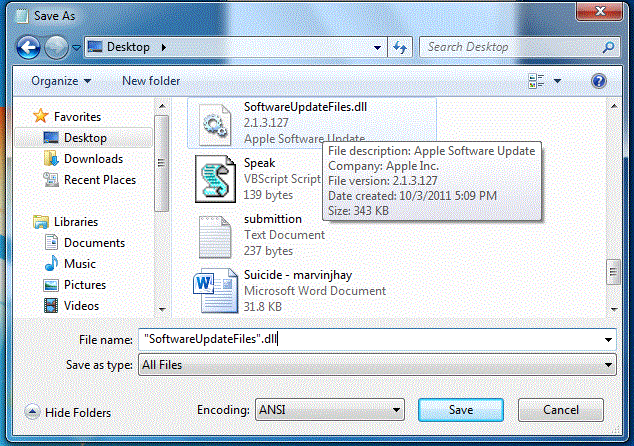 |
| Step 3 for deleting undeletable file: Click it once and add quotation mark |
The filename should have the extension of the undeletable file so that it will overwrite it. Then click save and it should ask you wether to overwrite it or not. ( if it ask you, that means your on the right track) Pick Yes.
Thats it, Now you should be able to remove the undeletable file just by deleting it normally.
How To Resolve Error Message Saying "Error Deleting File or Folder" & "File or Folder In Use"
In some cases if you try to remove files and then receive a message just like the pictures below that means that the file is currently use by a running program. If you wish to delete / remove it, open "task manager" by pressing (cntrl + alt + delete) or right click on the taskbar then click "Start Task Manager" and click the "process" tab find the program and right click and choose "End Process". Make sure you know what program is using the file that you want to remove. After that you may now delete that folder or files.
 |
| Window Xp : Error Message Saying Error Deleting File or Folder |
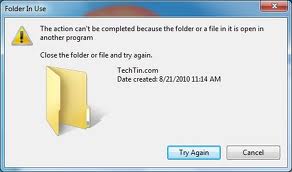 |
| Window Vista & 7 : Error Message Saying File / Folder In Use |
How to Resolve Message Saying "Folder Access Denied"
And if you see a message just like the picture below. That means that you dont have the rights to delete it, you need the Admin / Administrator's permission for you to be able to delete it. Log in the Administrator's Account and delete it.
 |
| Window XP : Error Message Saying You need permission to perform this action |
 |
| Window Vista & 7 : Error Message Saying You need permission to perform this action |
That's it, Hope your problem has been resolve.
 |
Have you enjoy? Please help us improve this article, We encourage you to kindly please post a comment below for your reaction, correction, question and suggestion. Thanks
Recover Deleted Files In A Free Way
 |
First is open recycle bin on the desktop then click or highlighten the deleted files then press the right click and choose "restore file" or just drag it out of the recycle bin and drop it to your desktop. That's it you now recovered your files.
 |
| Restore back files that has been deleted |
But in worse scenario, what if you deleted the file and you clean the recycle bin. Oh no, that would be a big problem for you. Well, I will tell you the fact that there's free software that can recover deleted files that have been deleted from recycle bin. The free software is called "Restoration".
What is Restoration
Restoration is an easy to use and straight forward tool to undelete files that were removed from the recycle bin or directly deleted from within Windows, and we were also able to recover photos from a Flash card that had been formatted. Upon start, you can scan for all files that may be recovered and also limit the results by entering a search term or extension. In addition, it also provides the option to wipe the found files beyond simple recovery. The program is small and standalone, it does not require installation and can also run from a Floppy disk. Restoration works with FAT and NTFS as well as digital cameras cards.
Download Restoration here
 |
| Restore back deleted files in Recycle bin that has been deleted |
After finish downloading, install it then go to C:Drive and open Restoration folder. Run Restoration program, click the "Search Deleted Files" button at the sidebar and wait until it finish searching for all deleted files. Then select the file that you want to restore back and click the "Restore by Copying" button.
That's it hope you like it.
 |
Have you enjoy? Please help us improve this article, We encourage you to kindly please post a comment below for your reaction, correction, question and suggestion. Thanks
Guide On How To Disable Automatic Reboot On System Failures
 |
Well, I will teach you how to disable the automatic rebooting of your computer. So when an error occured you will get the chance of knowing its cause. So lets disable the automatic restarting follow these steps.
 |
| Search sysdm.cpl using start menu search bar |
First click "start orb" then on search bar type in "sysdm.cpl" then click on it. Take note: In some cases in window 7 and vista you'll have to open it using right click then "run it as administrator".
After that, the System Properties box will appear. Click the "Advanced" tab then in Startup and Recovery click "Settings".
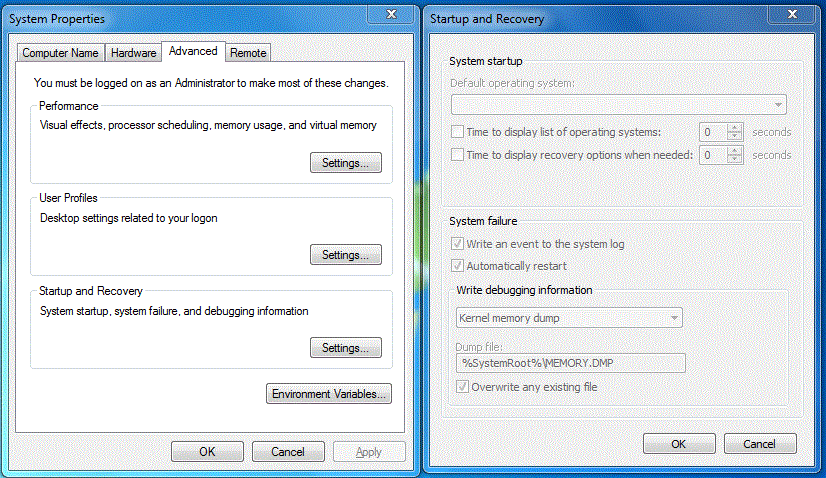 |
| System properties advance tab box and startup & recovery setting box |
Then Startup and Recovery box will appear. In the System Failure, uncheck the box for "Automatically Restart" and then click the OK button.
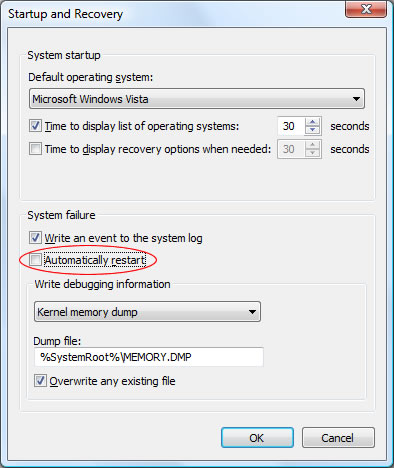 |
| Disabling / Turning off system automatic restart on system failures |
There you go, your computer now wont reboot if an error occured. You'll have the chance to fix it now.
 |
Have you enjoy? Please help us improve this article, We encourage you to kindly please post a comment below for your reaction, correction, question and suggestion. Thanks
How To Download From SoundCloud Limitless
 |
SoundCloud's open platform also supports a wide range of applications built on the SoundCloud API, enabling everything from mobile voice recording, online mastering, digital distribution to Facebook artist profiles and iPad music making. SoundCloud offers free accounts to amateur creators, with more advanced users able to upgrade to premium accounts for advanced features like statistics, controlled distribution and custom branding.
But did you experience when you go to SoundCloud, see a free track to download then a you see that "The track has reached its download limit" Do you still wish you could grab the download? Well, I'll teach you how you can do that, using the cloud downloader 1.5 thanks to MrXidus for sharing this.
Download Cloud Downloader here
You could see the download link just below the cloud download's youtube video.
After that, Copy the entire URL of the soundcloud music you want to download from your navigation bar and paste it into Cloud Downloader and click search then wait a few seconds. Then click the boxes next to the tracks you want to download and then select the location where you want to store downloads.
Depending on the track length and download size and your internet speed it may take some time. Once done you will have your donwloaded track.
 |
Have you enjoy? Please help us improve this article, We encourage you to kindly please post a comment below for your reaction, correction, question and suggestion. Thanks
How To Speed Up Computer's Start-Up / Shutdown
 |
Well, I will teach you how to fix that problems and how to optimize it for computer to regain its top performance speed. The first thing that we gonna do is to open "msconfig" to disable some non-important, unused or less prioritize programs that currently running hidden at your computer background. Just follow these steps
There are two ways to access / open msconfig, First is to click the "start orb" then at the search bar type in "msconfig" then wait a seconds to appear and press enter.
 |
| Opening msconfig using Search bar |
And the second is to click "start orb" then click "Run" and type in "msconfig" then press enter.
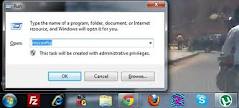 |
| Opening msconfig using Run |
Then click the "start up" tab and uncheck non-important, unused or less prioritize program except antivirus. But take note: If you are unsure on what the program is, better to do a research first before unchecking it.
 |
| Optimize your computer by disabling some start up using msconfig |
Next, click the "boot.ini" tab and on the "timeout" box change the default booting time 5 seconds to 30 seconds.
 |
| Optimize your computer by configuring boot time using msconfig |
After that close it and click "save" button. Well if there's a way on how to optimize / speed up your computer start up, ofcourse there is also a way on how to optimize / speed up computer's shutdown process. Ok lets start just follow these simple steps.
First, On your desktop click the "start orb" then type in "Regedit" and press enter.
After that, the "Registry Editor" will appear. Click the "HKEY_LOCAL_MACHINE" next click "SYSTEM" then "CurrentControlSet" and last is click the "Control" folder. Then Select "WaitToKillServiceTimeout"
Right click on it and select Modify.
Set it a value lower than 2000. In my example 1900 or lower than it. then click ok.
After that restart your computer to see some changes.
First, On your desktop click the "start orb" then type in "Regedit" and press enter.
 |
| Click start then type in regedit |
After that, the "Registry Editor" will appear. Click the "HKEY_LOCAL_MACHINE" next click "SYSTEM" then "CurrentControlSet" and last is click the "Control" folder. Then Select "WaitToKillServiceTimeout"
Right click on it and select Modify.
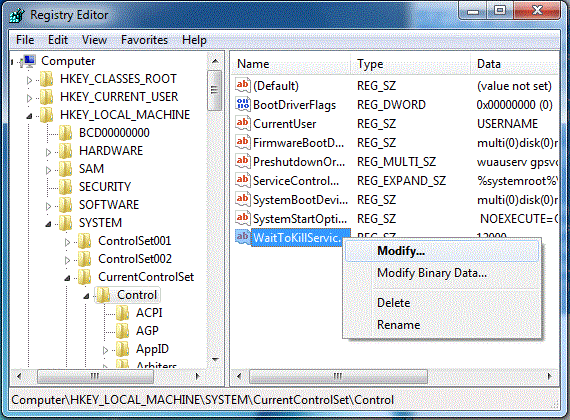 |
| Navigate to HKEY_LOCAL_MACHINE/SYSTEM/CurrentControlSet/Control & Select WaitToKillServiceTimeout |
Set it a value lower than 2000. In my example 1900 or lower than it. then click ok.
 |
| Change the default value 12000 to any number lower than 2000 |
After that restart your computer to see some changes.
 |
Have you enjoy? Please help us improve this article, We encourage you to kindly please post a comment below for your reaction, correction, question and suggestion. Thanks

 Previous Article


